Step Test: Finding your exposure time
Exposing screens using Photo Emulsion can feel tough, every set up is different and it's easy to miss something. Doing a step test and by checking the key points below, you'll find your perfect exposure time, for your set up, your environment and the equipment you have.
Get your exposure set up ready, following any instructions or advice that come with it.
Exposures are best done either under a safe light, such as a yellow light or UV blocking filters, or if doing at home a dimly lit room is best with no major light sources that might fog your screen.
Key points to check:
- Transparencies. Hold it up to a light, if its not blocking the light, it won't work. Read our guide to making great art work for transparencies.
- The transparency is flat and tight to the screen. Place your foam block one side, thin glass the other works best. This way the glass weighs the transparency down and the foam supports the screen. Need foam?
- The screen is correctly coated with emulsion and is completely dry. A scoop coater really helps here!
If you're good on the above, let's carry on!
So your overall exposure time will be different to others depending on how close your light is to the screen, how powerful your light is and what brand and type of emulsion you are using.
If there are manufacturers guidelines on light brightness or power and distance from the screen, follow them, it will give you a starting point. If you need a bit of guidance on this, drop us a line and we'll try and suggest your best starting points.
In this example, we are set up with our Exposure kit and we're going to say that we estimate the exposure time to be about 13 minutes. But we'll test from 16-11 minutes, because we're not totally sure and want to make sure we find out! By testing above and below your estimate you should find the sweet spot.
Take a screen, mark on the frame, on the side you'll have the transparency, (print side) a line every inch. You could use masking tape and mark the tape if you don't want to mark the screen.
The idea is that we are going to cover the screen with something that will not let light through, a large piece of black card works well, as you can manoeuvre this under the piece of glass. We will use the card to allow part of the screen to be exposed for longer than others.
Place your transparency on the screen as normal, so it fits your timing marks.
In this example we have put the card under the glass, you can also put the card on top of the glass if its easier for you.

As we're testing from 16 -11 minutes, on the screen, give each inch mark it's own unit of time, starting at 16 minutes, working down to 11 minutes.
Hopefully by now you can see where this is going!
Set your timer for 16 minutes counting down. Cover everything apart from the 16 minutes band. Switch your light on.
When the timer gets to 15 minutes, slide the card down and allow the 15 minutes band to start getting exposed.
Every minute move the card down until your last band is exposing, it should have 11 minutes to run at this point
.
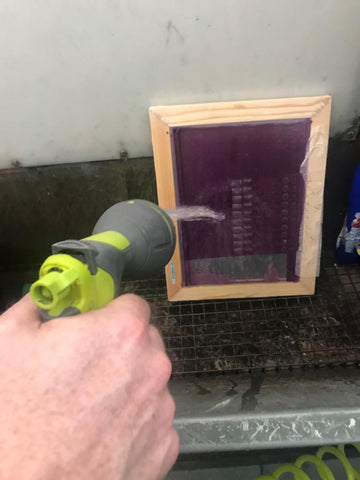
So you've now got a screen with 10 different levels of exposure. Time to go wash it out.
You'll find that some wash out too easily, some don't wash out at all but wait.. what's that one that washed out perfect?

If it looks like your in between say 12 & 13 minutes. Go burn a screen at 12.5 minutes.
You can dial this in further, down to 10 second increments if you want.
When you have done this and found the time that washes out perfectly (it should almost fall out) but all the detail is there, your edges are nice and crisp and the emulsion does not feel slimey, then this is YOUR EXPOSURE TIME!
With every variable the result will be different. So if you change your set up at all you might need to re-do the test. Different mesh counts will need different exposure times so you will need to test for each mesh count.
Still having a few problems? Then its time to check out:
Exposure Tips and Tricks - Trouble shooting
